photo Jane Richmond_zpsux4wawxl.png

Sunday, May 29, 2011

In the Garden... Beet and Goat Cheese Arugula Salad


This is our vegetable plot, modest compared to some but in a town like Victoria where a lot of people live in condos with only a patio for planting we feel really fortunate to have it.

 {Arugula}  

I've started nearly everything from seed, either indoors or directly in the garden. Below average temperatures and more rain than sun has made the early growing season a particularly slow one but today was my first harvest. 


{arugula, mesculin, spinach, and beet tops from the garden}


I decided to make my all time favorite salad, 
I love arugula and this salad is to die for, sometimes I crave it!
 

For the most part I follow the recipe but if you are a beet lover like me you know that beets take at least an hour in the oven. 

The first time I tried this recipe I followed the cooking instructions and had to keep resetting my timer because 12 minutes was only a fraction of how long it took to roast them (even sliced). 

...half the time I make this salad I boil the beets which takes just as long as the oven but results in a nice light flavour that goes really well with ingredients fresh from the garden.


 My fridge is always stocked with a Costco sized tub of feta so I always substitute the goat cheese and it's just as good.


 The arugula is what makes this salad really special but if you don't like it or you don't have it then mixed greens or baby romaine are both really great substitutes.

Find the recipe HERE.

Thursday, May 26, 2011

Off My Needles: Begbie Toque

I'm finally getting around to finishing up designs that have been in the works for ages... it's so embarrasing but I have all of these project bags full of unfinished work, some of which are bound off and just need finishing touches or photographs, or simple editing... So much for monogamous knitting.

One of these loose ends that I've just now wrapped up is my Begbie Toque. I knit this back when I was knitting everything out of Patons Classic Wool Roving. I had so much fun knitting the Begbie Cowl and I thought the stitch pattern would make an awesome toque.


 I've included two finishing options depending on how you wear your toque...


...and I was just dying to have a toque with a pom pom, which enabled me to use up every last inch of yarn. I literally had enough left to tie the pom pom onto the hat. 


PATTERN DETAILS:

Materials
• 100g/3.5oz ball of Patons Classic Wool Roving (shown in New Denim) 109m/120yds
• 6.5 mm/10.5 US dpns, set of 5
• 6.5 mm/10.5 US circular needle, 24 in
• Tapestry Needle

Gauge
14 sts and 18.5 rows = 4 in over st st

Sizes
To fit: 20(22) inch circumference


Friday, May 13, 2011

Monday, May 9, 2011

Revisions in the Works...

It has been too long since I posted Part 1 of my screen printing tutorial and I'll tell you why... My beginners luck ran out and I was having a really hard time burning my image onto the screen. It seemed like the more I read up on the subject the more I discovered I was doing wrong, until Mother's Day morning when my husband presented me with this...


...this book is awesome and the troubleshooting tips in each section are what really helped me pinpoint specific areas that needed to be tweaked in order to have success. 

So here is the plan, I'm working on a new Part 1 post using my new found knowledge and will have it up shortly, in the meantime I'll take the old post down to avoid confusion later on.

So bear with me as I'm still learning too and hopefully I'll have some useable information for those of you who would like to try screen printing for yourself.

Sunday, May 8, 2011

Thursday, May 5, 2011

Interview: Parts of Craziness

Just a few weeks ago Kimberly from the blog Parts of Craziness asked if I would answer a few questions for her blog. The post is up today if you would like to pop over and read it, and thank you Kimberly for all of your kind words, they made my day :)

Tuesday, May 3, 2011

Part 1: Preparing the Screen

Many of you expressed an interest in learning to screen print. I am making another screen at the moment and thought you might like to follow along to see what it's all about...

As I mentioned in this post, I am new to screen printing so I started off by purchasing a kit. Because I want to print on fabric I decided to go with the Speedball Fabric Screen Printing Kit. This kit is awesome, it includes everything you would need to get started. If you live in Victoria I recommend buying it from Opus not only because we want to support local but because Michael's is charging almost 40 dollars more for the same kit!


{ Step 1: Wash your Screen }

The very first thing you want to do with a brand new screen is wash it with a little dishwasher detergent and warm water, this will remove any film or residue that you can't see and leave the screen squeeky clean. Let the screen dry completely before moving on to Step 2. 

{ Step 2: Tape your Screen }

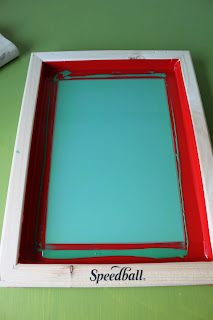
Next you'll want to tape your screen with water resistant tape. This red tape (which I purchased at Opus) is something that did not come in the kit and let me tell you, I learned the hard way that masking tape is no substitute so I highly recommend buying the real deal.

  (Tape both sides of your screen. If you didn't allow your screen to completely dry after Step 1 then your tape won't stick properly... most annoying.)

{ Step 3: Fill your Screen }

A screen is made of a fine mesh. To print an image onto a surface you need to turn your screen into a stencil of sorts by filling all of the holes around your image. There are so many ways of doing this and the Speedball kit I purchased includes materials for a number of different methods. In this demonstration I have chosen to "burn" the image onto my screen, this is a lot like developing a photo in a dark room. So for our next step we are going to fill our screen with Photo Emulsion fluid.

  ...place push pins in all four corners of the bottom side of the screen. Use your squeegee to coat the bottom side of the screen with a thin, even layer of the fluid.  

...flip the screen over and do the same on the inside of the screen.

Wipe up any excess fluid around the edges, this can be scooped up and returned to it's original container for future use. Place the screen to dry, bottom side down (elevated by the pushpins), in a location away from heat and light. My screen is tucked away in the closet of my office.  

...now we wait.